Appearance
k8s运维(四)Centos基础配置环境
k8s集群的搭建,需要配置环境 1.centos环境的基础配置
一、配置环境
1.配置yum的清华源
CentOS 6、7
sudo sed -e 's|^mirrorlist=|#mirrorlist=|g' \
         -e 's|^#baseurl=http://mirror.centos.org|baseurl=https://mirrors.tuna.tsinghua.edu.cn|g' \
         -i.bak \
         /etc/yum.repos.d/CentOS-Base.repo


更新缓存
$ yum clean all
$ yum makecache
2.安装常用工具
vim 编辑文件 git 版本管理 wget 下载文件 zsh 新版终端
$ yum install vim git wget zsh
安装oh my zsh 插件
$ sh -c "$(wget https://raw.github.com/ohmyzsh/ohmyzsh/master/tools/install.sh -O -)"

如果出现clone失败,可以手动下载
# step 1 将代码clone到本地
git clone https://github.com/ohmyzsh/ohmyzsh.git ~/.oh-my-zsh
# step 2
cp ~/.oh-my-zsh/templates/zshrc.zsh-template ~/.zshrc
# step 3
chsh -s $(which zsh)
# step 4
退出终端,重新打开即可
安装 高亮 和 历史记录 补齐插件
step 1 进入插件目录
$ cd ~/.oh-my-zsh/custom/plugins

step 2 下载自动补全插件 zsh-autosuggestions 和 高亮插件 zsh-syntax-highlighting
$ git clone https://github.com/zsh-users/zsh-autosuggestions.git
$ git clone https://github.com/zsh-users/zsh-syntax-highlighting.git

step 3
$ vi ~/.zshrc
修改
plugins=(git zsh-autosuggestions zsh-syntax-highlighting)
$ source ~/.zshrc
最后,重启终端,但是此时,你会发现,终端是没有主机名和用户名

$ vi ~/.zshrc
找到ZSH_THEME="robbyrussell"
改成agnoster 主题
并在文件末尾加上 2.1 显示主机名和用户名 prompt_context() { if [[ "$USER" != "$DEFAULT_USER" || -n "$SSH_CLIENT" ]]; then prompt_segment black default "%(!.%{%F{yellow}%}.)%n@%m" fi }
2.2 只显示用户名 prompt_context() { prompt_segment black default "%(!.%{%F{yellow}%}.)%n" }
2.3 只显示主机名 prompt_context() { prompt_segment black default "%(!.%{%F{yellow}%}.)%m" }
最后保存 source ~/.zshrc
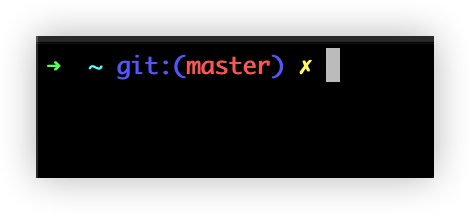
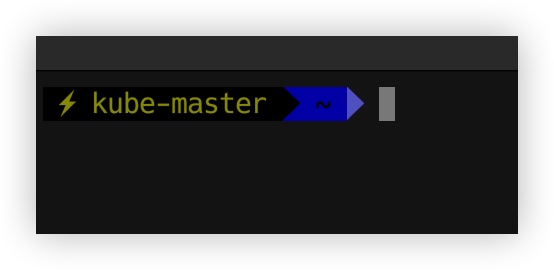
效果 主题github https://github.com/ohmyzsh/ohmyzsh/wiki/themes

3.安装telnet
查看资源
$ yum list | grep telnet
安装
$yum install -y telnet-server.x86_64$yum install -y telnet.x86_64
4.关闭firewalld
关掉系统的防火墙
$ systemctl stop firewalld
$ systemctl disable firewalld

输出:
Removed symlink /etc/systemd/system/multi-user.target.wants/firewalld.service.
Removed symlink /etc/systemd/system/dbus-org.fedoraproject.FirewallD1.service.

验证:
$ firewall-cmd --state
输出:
not running
5.SELINUX配置
关闭selinux
先验证一下,是否开启
$ getenforce 0
输出:
Enforcing

$ sed -ri 's/SELINUX=enforcing/SELINUX=disabled/' /etc/selinux/config
$ reboot
修改完之后,要对机器重启

再次验证
$ getenforce 0
输出:
Disabled
6.关闭firewalld
关掉主机的防火墙
$ systemctl stop firewalld
$ systemctl disable firewalld

验证
$ firewall-cmd --state
输出:
not running
7.永远关闭swap分区
$ swapoff -a
# 注释掉关于swap分区的行
$ yes | cp /etc/fstab /etc/fstab_bak
$ cat /etc/fstab_bak |grep -v swap > /etc/fstab

查看
$ free -m
              total        used        free      shared  buff/cache   available
Mem:           3784         198        3461           9         124        3400
Swap:             0           0           0
8.主机时间同步
安装ntpdate
$ yum -y install ntpdate
编辑时间
$ crontab -e
输入:0 */1 * * * ntpdate time1.aliyun.com
输出:
no crontab for root - using an empty one
crontab: installing new crontab

同步时间
$ ntpdate time1.aliyun.com
输出:
12 Jun 09:24:03 ntpdate[1500]: adjust time server 203.107.6.88 offset 0.060385 sec
9.修改网卡配置
k8s集群里面需要网络和流量转发操作
$ vim /etc/sysctl.conf
net.ipv4.ip_forward = 1
net.bridge.bridge-nf-call-iptables = 1
net.bridge.bridge-nf-call-ip6tables = 1
$ sysctl -p

输出:
提示 没有那个文件或目录  ,暂时可以不用管,之后会创建
9.启动内核模块
vim /etc/sysconfig/modules/ipvs.modules
输入以下五条
modprobe -- ip_vs
modprobe -- ip_vs_rr
modprobe -- ip_vs_wrr
modprobe -- ip_vs_sh
modprobe -- nf_conntrack_ipv4

分别启动下面命令
$ modprobe -- ip_vs
$ modprobe -- ip_vs_rr
$ modprobe -- ip_vs_wrr
$ modprobe -- ip_vs_sh
$ modprobe -- nf_conntrack_ipv4

检查是否执行
$ cut -f1 -d " "  /proc/modules | grep -e ip_vs -e nf_conntrack_ipv4
输出: 
